Appearance
Image Export
Core Feature
This feature is available in all Portrai Explorer deployments.
Capture your visualizations as PNG images for presentations, publications, or documentation.
Map Viewer Export
The Map Viewer in the Explorer workspace allows you to capture the current view as a PNG image.
Accessing Export
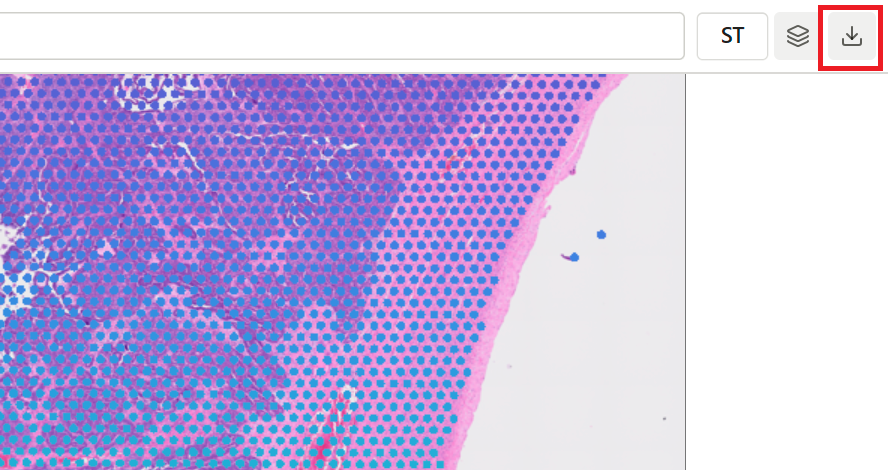
- In the Explorer workspace, locate the toolbar in the top-right corner
- Click the Export button (download icon)
- A popover menu appears with export options
Export Popover
The export popover provides two sections:
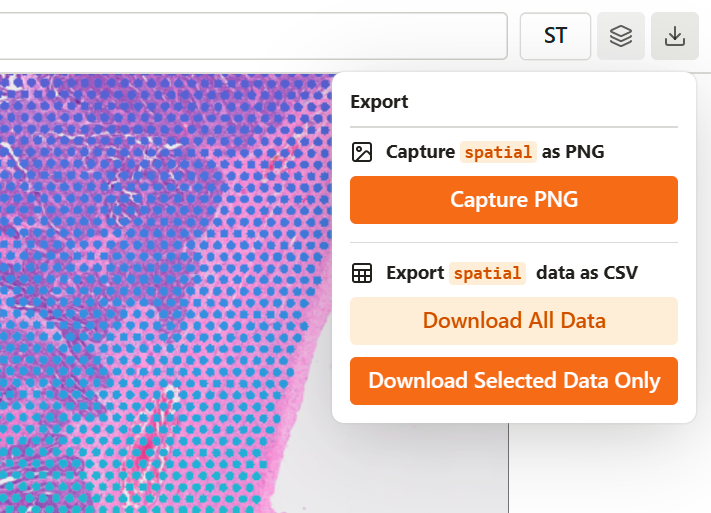
Capture as PNG
Captures the current map view including all visible layers.
- Click Capture PNG
- The image downloads automatically
Export Data as CSV
Also available in this popover:
- Download All Data - Export current projection coordinates for all points
- Download Selected Data - Export coordinates for subset points only (requires active subset)
What's Included in Map Capture
| Element | Included |
|---|---|
| Data points | ✓ All visible points with colors |
| Background image | ✓ All visible image layers (H&E + fluorescence channels) |
| Legend | ✓ Color legend (if color mapping applied) |
| Image adjustments | ✓ All per-channel settings (contrast limits, colors, opacity) |
| Background color | ✓ Black for fluorescence-only, white otherwise |
Not included:
- UI elements (toolbar, sidebar, subset panel)
- Mode switcher controls
File Naming
Map captures are named based on the current projection:
{projection_name}_1x.png
Examples:
Spatial_1x.pngUMAP_1x.pngt-SNE_1x.png
Facet Grid Export
When Facet View is active, the Map Viewer's Export button captures the entire facet grid as a single image.
Accessing Export
- In the Explorer workspace, enable Facet view and select a column to facet by
- Click the Export button (download icon) in the toolbar
- Click Capture PNG
The entire grid of per-category panels is captured as one PNG, including each panel's background image (for spatial projections), points, and category label. CSV export of the projection data is also available from the same popover.
Scatter Plot Export
The Scatter Plot in the Plot extension provides PNG capture functionality.
Accessing Export
- Open the Plot extension
- Configure your scatter plot (X axis, Y axis, color mapping)
- Click the Export button (download icon) in the top-right toolbar
Export Popover
- Click Capture PNG
- The image downloads automatically
The same popover also offers Export data as CSV with Download All Data and Download Selected Data buttons. See Plot Data CSV Export for what these contain.
What's Included in Scatter Plot Capture
| Element | Included |
|---|---|
| Data points | ✓ All visible points with colors |
| Axes | ✓ X and Y axis lines |
| Axis labels | ✓ Tick marks and values |
| Axis titles | ✓ Column names |
| Grid lines | ✓ Background grid |
| Legend | ✓ Color legend (if color mapping applied) |
File Naming
Plot captures are named after the plot's title (the name shown in the panel titlebar), with the key content appended so saved files stay identifiable:
{plot title} - {x_axis} vs {y_axis}.png
Examples:
Scatter Plot 1 - UMAP_x vs UMAP_y.pngT-cell markers - CD3E vs CD4.png
Renaming the plot panel changes the exported filename. The same title-based rule applies to every plot type — only the appended detail differs: the axis columns for scatter plots, the variable list for violin and box plots, and the Group By column for bar, dot, and stacked bar plots. Characters that filenames cannot contain are replaced with _, and very long names are truncated.
SVG Export
The Bar, Box, Dot, Violin, and Stacked Bar plots are drawn as vector graphics, so they can also be exported as SVG in addition to PNG.
Accessing SVG Export
- Open the Plot extension and configure one of the SVG-rendered plots (Bar, Box, Dot, Violin, or Stacked Bar)
- Click the Export button (download icon) in the plot toolbar
- Click Capture SVG
- The vector file downloads automatically
The exported SVG is a transparent, resolution-independent vector at the plot's logical size, so it composites onto any background and stays crisp at any zoom — ideal for papers, reports, and slides where you may want to edit the figure in tools such as Illustrator or Inkscape. PNG export remains available from the same popover for a white-background raster image.
Scatter Plot is PNG only
The Scatter Plot renders points on a canvas rather than as vectors, so it offers PNG only — there is no SVG option for scatter plots.
SVG files follow the same title-based naming rule as PNG exports, with a .svg extension.
DEG Heatmap Export
InSilicoLab Feature
This feature is exclusive to Portrai InSilicoLab.
DEG analysis heatmaps can be exported from the DEG Analysis workspace. See DEG Analysis - Heatmap Image Export for details.
File naming format: DEG_Heatmap_{date}_{metric}_{direction}_FDR_{threshold}_Top{n}.png
When axis swap is enabled, the filename includes a _Transposed suffix.
DEG Volcano Plot Export
InSilicoLab Feature
This feature is exclusive to Portrai InSilicoLab.
DEG analysis Volcano Plots can be exported from the DEG Analysis workspace in Single View mode. See DEG Analysis - Volcano Plot Image Export for details.
File naming format: DEG_Volcano_{date}_{group}_{yAxisMetric}.png
Export is only available in Single View. Grid View does not support image export.
Image Resolution
Exported images are captured at your device's pixel ratio:
| Display Type | Resolution |
|---|---|
| Standard (1x) | Screen resolution |
| Retina/HiDPI (2x) | 2x screen resolution |
TIP
For higher resolution exports, zoom in on the area of interest before capturing. The exported image will contain more detail for that region.
Tips for Better Exports
Before Capturing
- Frame your view - Zoom and pan to the area of interest
- Apply colors - Set up the color mapping you want to show
- Adjust point size - Ensure points are visible at export size
- Check the legend - Verify it displays correctly
For Presentations
- Zoom to fill the frame with relevant data
- Use high contrast colors for visibility
- Adjust background image opacity if it obscures data points
For Publications
- Verify resolution meets journal requirements
- Use colorblind-friendly palettes when possible
- Ensure the legend is readable
- Consider post-processing in image editing software if needed
Troubleshooting
Capture Button Not Responding
- Wait for all data to fully load
- Ensure the map/plot has finished rendering
- Try refreshing the page
Image Missing Elements
- Check that layers are visible in Layer Settings
- Verify color mapping is applied
- Wait for the legend to render before capturing
Low Resolution Output
- Export on a higher resolution display if available
- Zoom in on the area of interest for more detail
Large File Size
- Complex views with many points produce larger files
- Background images increase file size
- Consider subsetting to reduce point count
Related Topics
- CSV Export - Export data to CSV format
- Facet View - Split the map into per-category panels
- Color Mapping - Configure colors before export
- Layer Settings - Control layer visibility
- Scatter Plot - Scatter plot configuration
- DEG Analysis - DEG heatmap export